Thursday 7 December 2017

Album Cover

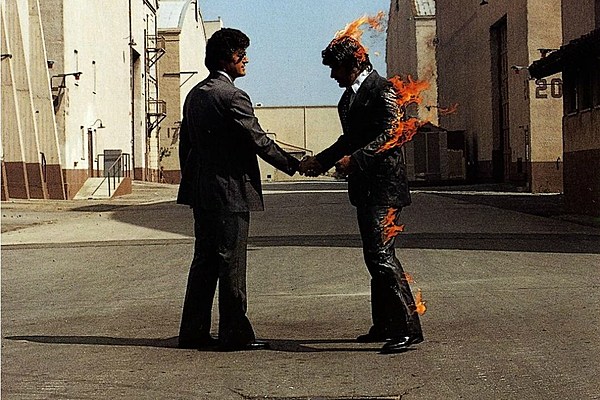
Pink Floyd - Wish you were here.


I wanted to research the above album cover as it is from one of favourite bands, Pink Floyd, and I find imagery interesting and I feel it raises some interesting questions.  I went about researching the album cover to find out more.

I found the following link that contains some useful information about the album cover, I also found this link that explains more about the image and it's themes.  The theme for this album was absence. Originally the band and cover designer wanted to go with a blank cover, but the Beatles had already done this.


The designer, Storm Thorgerson, was responsible for the cover and decided to go for a shrink-wrapped cover for the LPs in black and opaque cellophane. Some fans cut the sleeve with a blade and slid the record out so have never seen.  I researched other work that Storm has worked on and found that he designed the cover for the Audio Slave album in the early 00s.


The front cover also features a pale border that appears to have a burnt effect to it as if it has been heated or partially set on fire. The cover was shot in a studio back lot, to create the effect of the burning man, the design team doused  a stuntman (wearing an asbestos suit and wig) with gasoline and set him on fire. The wind blew the flames against his face, burning his real moustache. The men in suits symbolise stereotypical corporate executives — the type who ignorantly ask, “Oh by the way, which one’s Pink?” in the song “Have a Cigar” which opens Side 2 of the album.


This photo was taken during the shoot showing the flames as the stuntman starts to attempt to put the fire out.


The back cover consists of an invisible man in a suit in the desert.  This image connotes the death of the faceless salesman and the anti corporate message that the band are trying to evoke.  The back also contains a pale border that interacts with the main image where the sand appears to spill out from the image.  This effect makes the image appear more real and gives the impression that there is a real world within the cover.  


Objective:

  • To be inspired by your favourite album cover.
  • To research one of the 100 album covers below


Task:

  1. Look at this list of the top 100 album covers of all time from Rolling Stone
  2. Pick you favourite one that is photography based and print it out
  3. Annotate your chosen album cover by hand.  Use elements such as form, shape, lines, tone, balance...
  4. Look into other work created by the album artist and find out what else they have worked on
  5. create a few slides that covers what you have found out.  You should be trying to find out the following:
    • Artist that worked on the album and other work they have done
    • What the cover means
    • How the cover fits in with the theme of the album
    • How the back cover compliments the front
    • Include links to sources you have used
    • Discuss about the process of the photoshoot
    • Outline the 
  • Before you start this task, you should make sure there is enough information about your chosen album available online.  Look at the depth I have gone into in my work and this will give you some idea of the level of detail I need.
Task checklist -  have you done the following?
  • Explained why you have picked THIS cover?
  • Shown where you have got the information from in the form of hyperlinks
  • Discussed other work completed by the artist and included their work with your slides
  • Discussed both the front and back cover
  • Discussed the process, is there any process evidence that you can find?
  • Discussed the meaning that was intended from the cover and how it aligns with the theme of the album.

Homework

Listen to the album from start to finish and have a go at discussing the relationship between the music and the visuals, consider the following:
  • How do the lyrics align with the cover?
  • How does the tone of the music align with cover, is it dark or light, happy or sad?
  • What sort of genre would you describe the music to be?
  • What would be the best way to listen to this music, in a party, in the car, in a room by candle light?
  • Is the music what you might expect based on the cover?
Plan a photoshoot that has been inspired by the album cover you have looked at
  • Draw a plan by hand
  • What equipment will you need?
  • Where will you need to take the photos?
  • Do you need any models?
  • What sort of technique might you need to adopt
Deadline: Thursday 21st December

Sunday 3 December 2017

Cyanotype


So far you have had a little look at making a cyanotype from a small research task.  Lets now start to make some preparations to make one ourselves

Task:
  1. Using the instruction demonstrated in class, make your inverted, black and white, high contrast photo collage in photoshop and print it out on acetate.
  2. Once you have completed this, you need to do the same for an image you have taken.


Thursday 30 November 2017

Film is Amazing

Photograms and chemigrams


In class last week we made a chemigram, but there is another thing you can do with the light sensitive paper called a photogram.  To do this you need to take out a sheet of paper in the dark and expose it to light while part of it is covered by an object.  To do this you need a dark room.

In this lesson you need to work backwards, find out what a photogram is and explain how to make one, you also need to explain what we did in class to make our results.

Things to find out:

  1. how many ways can you make one?
  2. what sort of chemicals do you need?
  3. what paper do you need?
  4. what objects work best?
Add images of work you find online and add you own work to the slides

If you finish all this, find out what a cyanotype is and made a post that explores this technique

List of links

Sunday 19 November 2017

Matchbox Camera

Expectations for Matchbox Camera post

Your matchbox camera post should include the following:
  • Artist research on Justin Quinel including images (continued)
  • Instructions on the construction of the camera using the video. Including resources needed 

Monday 13 November 2017

Camera Sim

Use the camera sim to take 4 photos of the scary girl, keep the setting on manual and adjust the settings yourself.  Once you have have taken your photos try it again in darker conditions.

  1. Slightly blur the toy wind mill
  2. Blur the background
  3. Freeze all movement
  4. Keep everything in focus
If the embedded version doesn't work, then use this link

Saturday 11 November 2017

6 month exposure

Watch The ‘life of a pin hole photographer’ video

Now watch the institutional video about making the 6 month duration pin hole camera. Make notes on all the equipment that you need.Don't worry about the paper.


Task - 

  • Spend some time thinking about where you could leave a beer can camera, consider the path of the sun and the shot you may get.  
  • Create a slide that looks at the work of Justin Quinell, who is he and what does he do?
  • Create a slide that explains what you are going to
  • Add a screen shot of google maps that shows where you are going to place your camera
  • Bring in a WASHED OUT, Aluminium drinks can for next lesson


Friday 3 November 2017

Bokeh

Your images are here

the way the lens renders out-of-focus points of light


objective:

  • To identify images that contain examples of bokeh and
  • produce your own images that contain bokeh

Task (lesson)
  • Find some images from the web that contain some bokeh
  • Explain how these images are created and how to create the most dramatic bokeh
Homework (deadline 10/11/17)
  • Create your own images at home that show off the effect - the best images will have an object in focus while having some bokeh in the background like this:


Extension task
  • Create a heart shaped bokeh
Tips (will be discussed in class)
  • De-focus the background
  • Use a low aperture setting 1.8
  • Other compensations will need to be met to enable a low aperture setting
  • Zoom in
  • When focusing on the foreground, make sure the difference between the foreground and background is large
  • I don't want just blurry images

Tuesday 31 October 2017

Ansel Adams - Exemplar Case Study


Emily Upton's example of a case study

Task 1 (6th and 7th of November) - 
Pick one of the following photographers/artists:
Ansel Adams
May Ray
Richard Avedon
Dorothea Lange
Steve McCurry
Irving Penn
Edward Weston

Find out about your choice and write a short biography, continue to find out about other work being created at the same time (google search art work created between **** - ****).  You need to gather the following information:

  1. What sort of work did the artist create?
  2. Did they produce any books?
  3. What were other artists doing at that time/country?
  4. What was happening in their time culturally & politically?


Tilt Shift


Tilt Shift photography is simply creating a graduated blur to create the illusion of an impossible depth of field that could only be created if the image was a tiny model.  It is an illusion but very effective.

Task
Use this tutorial to make a tilt shift image yourself.  You can use the same image in the tutorial


In total you will have 3 images to tilt shift
  1. the above image
  2. one image you have chosen
  3. one that you have taken a picture of yourself
all to be done by 10/11/17

Extension

There are some people who I'm expecting to complete an extension activity.  Have a look at what to do here.

free lensing is a technique where you can detach the lens from your camera and take pictures through your detached lens. Here are some results


Wednesday 18 October 2017

Gestalt In Photography


Click the link above to find out more about Gastalt


Objective:
to Understand the principals of Gestalt theory within photography

Task:

1.
Create 3 slides (2 concepts per slide) that explains the 6 gestalt areas using the above link and stuff what Mr Jones said in lesson.

Deadline: Tomorrow

2.
Choose one image from the ones below and explain how they can be considered to have gestalt characteristics.  Pick one of the 5/6 areas of gestalt that apply best to the image you have chosen.


Remember


Deadline: 20th of October 3:20pm


Monday 16 October 2017

Mood Board

Create a moodboard for your component 1

This will help show me what your project is about.  Take images from the web that help demonstrate your theme visualy. You will also need to answer the following questions for each image


1. Why are these pictures here?
2. How did you find them?
3. How are they going to help you make progress?
4. How are they grouped?
5. How did you decide on these images?

Thursday 5 October 2017

Self Portrait


Objective
To create a double exposure work within a set theme
Task
You need to create slide that explores the theme of Self Portrait.  Complete the following tasks
  1. Complete some artist research Vivan outlining themes with her work, include images from artist
  2. complete a photoshoot including 3-4 final images and a contact sheet
  3. Discuss what you did and how you did it
  4. Include a contact sheet, I want to that you have taken at least 20 photos


Deadline 
13th of October

Thursday 28 September 2017

Contre Jour


Objective
To create a few slides that demonstrates your ability to understand Contre Jour

Task.
You will need to create a few slides that demonstrates your ability to understand Contre Jour

  1. Find some (2-3) examples from the net and explain what centre jour is
  2. Add your example of centre Jour and explain how you made it
  3. Add screen shots of the photoshop work you did to enhance it.

Deadline

Thursday 21 September 2017

History of photography


Objective

To explore a brief history of photography

Task
You need to make a padlet about the history of photography, use my posts on the blog to create you own padlet about the history of photography


Presentation
Padlet

Deadline
7th of November - work on it slowly when you have time